
Microsoft OneNote is a note-taking program and multi-user collaboration platform. In simple words, it is your digital notebook, and you can perform all actions you could on a physical notebook. In this post, you will learn about OneNote – how to use it and 10 essential tips to improve productivity.
OneNote is available for Windows, macOS, and online usage. This digital notebook also comes as part of the Microsoft Office 365 package. But I suggest you use the standalone version of the app that you can download from the Windows Store on your Windows computer. It is because the app version is more suitable for Writing and Schoolwork.
- How to use OneNote
- 1. Download & Install
- 2. Lines Setup
- 3. Create First Note
- 4. How to move a page in OneNote
- 5. Writing and Typing
- 6. OneNote – How to use Note Tagging
- 7. Add Images, Videos, Link, and more content.
- 8. Math Assistant
- 9. Delete or Undelete
- 10. Use on Multiple Devices
- 11. Mobile & Online
- 12. Dictate & Voice Command
- Repair or Troubleshoot OneNote App
- Conclusion
- OneNote FAQs
How to use OneNote
To use OneNote, you need to install the app on your Tablet PC, Laptop, or Desktop. If you want to take the whole experience, I suggest using it on Touch Screen, Tablet PC, Laptop, or Desktop with writing tablet. Using a stylus for writing will feel like writing on an actual notebook digitally. Follow the below steps on how to use OneNote for a smooth experience:
1. Download & Install
You can download and install this digital notebook from Microsoft’s official website or from Windows Store. Suppose you already have the Microsoft Office Subscription. In that case, you can use the same account to connect with OneNote app for Windows. As suggested earlier, it would be good if you install it from Windows Store.
Once the installation is complete, open the OneNote app and log in to your Microsoft Account. You will see something like this (refer to the image below).

2. Lines Setup
If you see only a blank page without rule lines, you can insert rule lines by visiting the menu bar and heading over to View > Rule Line. From there, you can either choose grid lines or rule lines. You can also set rule lines as default by ticking the checkbox. (Refer to the image)

Tip 1: If you are not using any stylus or writing pad, make sure to change the font size to fit in the rule lines.
3. Create First Note
Ok, so now you have set up the lines on your page, and it will look similar to your physical notebook. To create a note, switch to the left panel on your OneNote app. At the bottom left, you will find two options: 1. Add Section, 2. Add Page.

Click on Add Section first to add a section in this notebook app and add a page to create notes. OneNote app allows you to create as many sections as possible and pages depending upon your requirements.
Tip 2: Make sure to use the appropriate section and page structure for convenient usage.
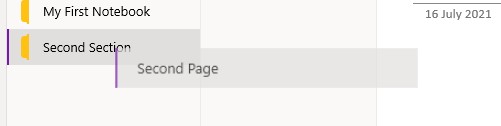
4. How to move a page in OneNote
Do you know that you can move a page from one section to another in OneNote? If you have added a page to the wrong section by mistake, you can overcome it by moving it to the appropriate section.
To move a page, simply drag and drop it to the section.
5. Writing and Typing
OneNote allows you to write or type to create a note. As said earlier, you can use any touch screen laptop or writing tablet to easily write on OneNote. Here are some of the best graphic tablets that can serve your purpose.
If you want, you can also type to create and save notes. The best thing is there is no need to format it again and again, and you can continuously write/type on a single page.
Tip 3: Easily switch from typing to write by clicking on the draw tab.
6. OneNote – How to use Note Tagging
If you regularly take quick notes and use OneNote most of the time, prioritizing your notes according to the requirements would be a good idea. E.g., if you have created 100s of notes but looking for a specific note can waste too much time. In such a case, you can tag the notes to prioritize those as per requirements.
To tag a note, use the tag drop-down menu with a checkbox and select any tag. You can also create a custom tag. (Refer to the image below). If you quickly want to tag a note, simply right-click anywhere on the note page, and choose the already created tag.

You can search for any keyword or tag from the search option in the left panel.
Tip 4: The “To Do” tag allows you to select or clear the checkboxes.
7. Add Images, Videos, Link, and more content.
OneNote allows you to insert various rich-media content types such as Images, Videos, Links, Documents, Meeting Details, Audio, Stickers, Maths, etc. You can directly include online videos from YouTube or any other video hosting website. Simply share the link to the video, and it will be included in your note.
Switch to the Insert tab, and you will find various options to include external items in your document. The best part is, you can add more documents to your notebook by simply importing any PDF document. E.g., if you want to add any printout material, you can click on Printout under the Insert menu.

Tip 5: If you want to embed YouTube videos, you can simply paste the Video URL, and it will embed the video to your note.
Tip 6: Make sure to move the added object as per your requirement. You can also customize the sizes of the video player, document, or image by changing the dimensions.
8. Math Assistant
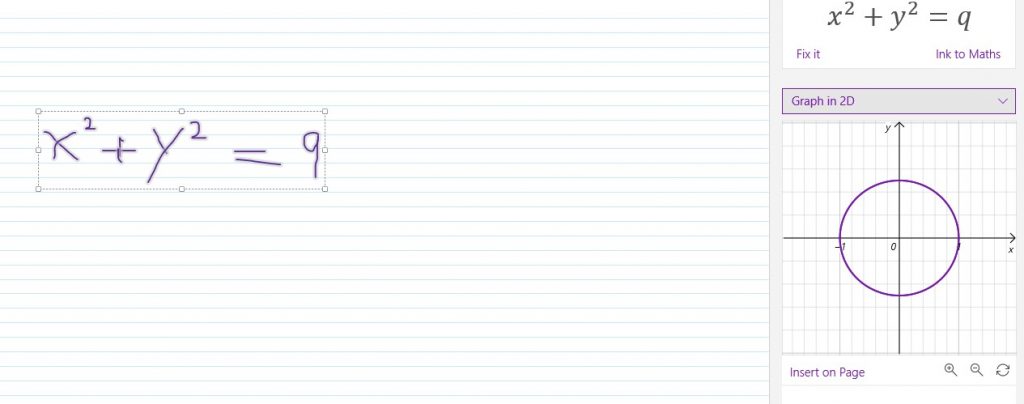
It is the best option that I love about OneNote for Windows 10. You can simply write any equation or mathematical term. OneNote will give you the solution, graph, or correct maths equation.
To do so, you can write any maths equation using the styles or tablet pen, or even your mouse. After writing the equation, use the Lasso Select from Draw Menu and circle the equation. After doing so, click on the Maths Tab, it will open a panel on the right.
Now the maths magic begins, select an action you want to perform on the equation, and you will have the solution. Voila! Now, click on insert on-page, and it will be added to your note page.
Tip 7: The above feature is not available on the OneNote application package. You need to install OneNote for the Windows app.
Tip 8: OneNote can solve so many mathematical expressions and problems. Try solving a math problem by yourself, and let me know if this worked on your computer.
9. Delete or Undelete
You can delete a note page or section by clicking on its name and then clicking Delete Page or Delete Section. OneNote, by default, saves the work automatically, and when you come back again, you can continue from where you left.
It is beneficial to save your work from any sudden computer failure. It is recommended to stay connected with the internet to save the backups.
If you have deleted a note, you can try to recover it by following this article by Microsoft Support Team.
Tip 9: Always be cautious while deleting your work; it might be impossible to recover the deleted note in some cases.
10. Use on Multiple Devices
You can create notes and use the same note on multiple devices by Sync feature. Suppose you are working on your home computer, then left for office. You can finish working on the same note by logging in to OneNote on the computer.
To enable the Notebook Sync, expand the navigation panel and right-click on the current notebook’s name. Now click on the Sync tab and then click on “Sync this notebook” or “Sync all notebooks.” I suggest you turn on Sync for all notebooks.

Tip 10: Let me remind you that sync will work only when connected to a reliable internet connection. If you cannot connect to the internet at the moment, make sure to open the OneNote app when you get the internet connection back.
11. Mobile & Online
You can use the OneNote app on your Android or iPhone. The app is available to use for free on mobile phones and online. You can install the latest version from Google Play Store or Apple App Store.
You will need to log in with a Microsoft account to use the Mobile app and the website.

The online web version can be accessed at https://onenote.com/hrd. However, you might find several bugs in the online version. It seems like Microsoft does not really care about OneNote online.
12. Dictate & Voice Command
Feeling lazy to type or write? You can use the Dictate and give voice commands to make your work easier. Click on the Dictate (with Mic) option under the Home tab to enable the use of the computer’s microphone.
Dictate command is also available on other office applications such as Word & PowerPoint.
Tip 11: While using the dictate or voice record option, make sure to change the dictation language for convenient use.
Repair or Troubleshoot OneNote App
If your OneNote app is not working correctly, you can troubleshoot it by following the below guide. This troubleshoot works in most cases, but if it does not fix your problem, try contacting the Microsoft Support team or wait for an update with a possible fix.
Troubleshoot OneNote App for Windows 10
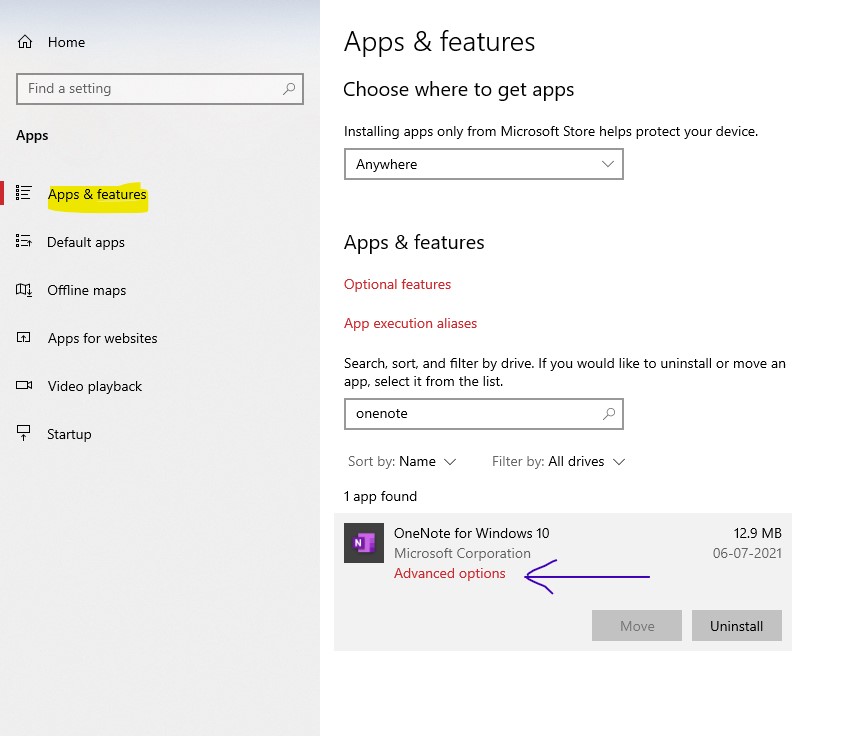
1. Open the Settings app from the Windows Start menu or simply type “Setting in the search area” on the taskbar.
2. Now, click on the Apps tab to open Apps & Features. Here you can manage any app installed on your computer.

3. In the list, type “OneNote” or simply scroll down till you see OneNote for Windows 10 App. Click to expand the details and then click on Advanced Options.
4. Scroll down to the reset heading and click on the Repair button. Please note that it will not delete any app data.
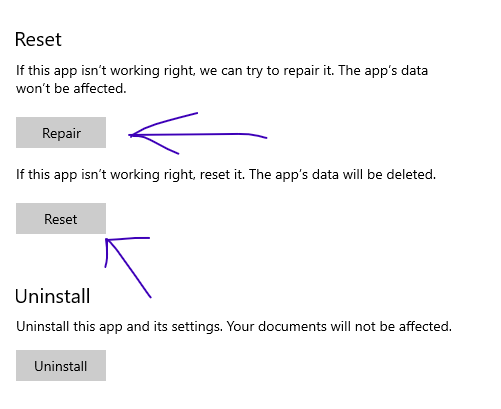
5. If the repair options do not work, you can reset or uninstall the app from your computer. Restart the computer and reinstall OneNote again to see if everything works fine.
6. If you are still facing issues with the app, contact the Microsoft Support team and ask for a possible solution.
You might want to see: Cheap Flight Booking Deals
Conclusion
I appreciate for taking the time to read it till last; you are fantastic! If you like the post, please share it with others and let them know about these features of OneNote. If I made any mistake and you want to provide your feedback, please do not hesitate to include that in the comment section below.
You can also contact me for more helpful content and other help related to internet applications, software, etc.
OneNote Alternatives
OneNote is not the only note-taking app you can use on your computer or smartphone. There are some other alternatives too that are easier to use and provide great features. Some of the top options to OneNote are:
- Google Keep
- Zoho Notebook
- Evernote
- Notion
- Simplenote
- Notability
I will soon share the post comparing all the best alternatives to Microsoft OneNote. If you want to check out the free alternative to Microsoft Office, you can check this post.
OneNote FAQs
Is OneNote suitable for beginners?
Microsoft OneNote can be used efficiently by both Beginners and Experts. Follow the step-by-step guide I have mentioned above to understand the basics of the OneNote app.
Why does my OneNote not sync properly?
Please note that the Sync mostly depends upon the internet connection. If you are facing some problems in syncing, make sure to test your internet connection. You could also try to repair OneNote by following the guide mentioned above.
Why cannot I use Math Assistant in my OneNote?
You need to install OneNote App from Windows Store to use Math Assistant. It is not available on the OneNote program app (bundles with Microsoft Win32 Package). However, you can create any equation on a desktop app too.
How to hide spelling errors on the OneNote app?
Open the OneNote app, click on the three-dot menu on the top-right corner, and then click on Options. Now, scroll down to the Proofing option, and enable the “Hide Spelling Errors.”
How do I disable Photo and files sync?
Click on the 3-dot menu on the top-right corner, and click on Options. Now, scroll down to disable files and images. Enabling this option will not download all files and photos on each page automatically.
Disclaimer: OneNote logo is the copyright trademark of Microsoft Corporation.